Remote Assistance
SahliTech can remotely connect to your computer to preform estimates, repairs or maintenance.
We use the AeroAdmin program for remote connections, please follow the steps below so our technician can login to your system.
First Step: Download the Remote Client
The First step is to download the AeroAdmin Remote client program,
Click the button below to download the remote software:
Download Remote Client
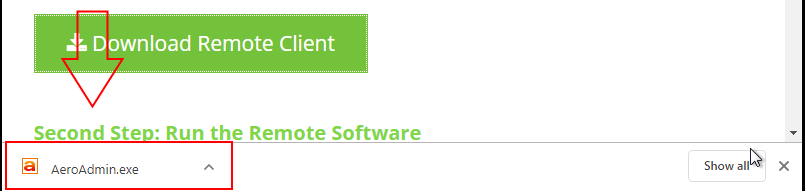
Second Step: Run the Remote Software
Once you download the “AeroAdmin” file, run it
Third Step: Send “Your ID” to the SahliTech Technician
locate the “Your ID” field it is on the left side of the remote program, in the blue box. When you first open the software it will take a minute or two for the “Your ID” field to populate.

Once you recieve “Your ID” you will need to send it to your SahliTech technician.
You can submit your remote ID directly to your SahliTech technician via call, text, or email. You can also submit your remote ID on line, using the link below.
Submit Your Remote ID
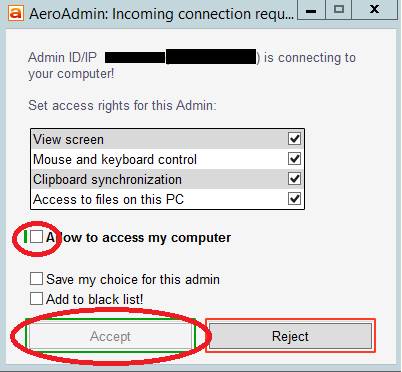
Forth Step: Check the “Allow access to my computer” box and click the “Accept” button.
When the SahliTech technician attempts to connect to your computer, you will see this message asking to accept the request.
Check the “Allow access to my computer” box then click the “Accept” button.
More Help:
For more instructions, videos on how to download and run the remote software please select your browser below.
Your browser is the program that you use to explore the Internet, see the icon table below to see what browser you use, if you don’t already know.
Help With Microsoft Edge
1. Click the “Download Remote Client” Button above
2. At the bottom of the screen, click “Save” on the ribbon that appears.
3. After the download finishes, click “Run”
4. Wait for the remote program to launch, if nothing comes up after a few minutes look at the task bar, at the bottom of the screen. There should be a orange flashing icon, click on it.
5. Once the remote program is opened you will see this screen, wait a few seconds and “Your ID” field in the blue box, will populate. Send this number to your technician so they can log in.
6. When your technician attempts to log on you will see this screen. Check the “Allow access to my computer” box and click “Accept” (Next to the green lines)
Help With Microsoft Internet Explorer
1. Click the “Download Remote Client” Button above
2. At the bottom of the screen, click “Save” on the ribbon that appears.
3. After the download finishes, click “Run”
4. Wait for the remote program to launch, if nothing comes up after a few minutes look at the task bar, at the bottom of the screen. There should be a orange flashing icon, click on it.
5. Once the remote program is opened you will see this screen, wait a few seconds and “Your ID” field in the blue box, will populate. Send this number to your technician so they can log in.
6. When your technician attempts to log on you will see this screen. Check the “Allow access to my computer” box and click “Accept” (Next to the green lines)
1. Click the “Download Remote Client” Button above
2. At the bottom of the screen, the download will start
3. After the download finishes, double click “AeroAdmin.exe”

4. Wait for the remote program to launch, if nothing comes up after a few minutes look at the task bar, at the bottom of the screen. There should be a orange flashing icon, click on it.
5. Once the remote program is opened you will see this screen, wait a few seconds and “Your ID” field in the blue box, will populate. Send this number to your technician so they can log in.
6. When your technician attempts to log on you will see this screen. Check the “Allow access to my computer” box and click “Accept” (Next to the green lines)
Help With Mozilla FireFox
1. Click the “Download Remote Client” Button above
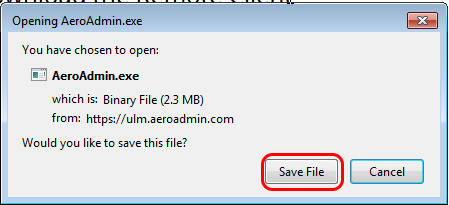
2. after you click the download button a new window will appear, click “Save File”
3. Open your downloads, click the blue arrow icon in the top right corner. Then double click “AeroAdmin.exe”
4. Wait for the remote program to launch, if nothing comes up after a few minutes look at the task bar, at the bottom of the screen. There should be a orange flashing icon, click on it.
5. Once the remote program is opened you will see this screen, wait a few seconds and “Your ID” field in the blue box, will populate. Send this number to your technician so they can log in.
6. When your technician attempts to log on you will see this screen. Check the “Allow access to my computer” box and click “Accept” (Next to the green lines)
1. Click the “Download Remote Client” Button above
2. At the bottom of the screen, click “Save” on the ribbon that appears.
3. After the download finishes, click “Run”
4. Wait for the remote program to launch, if nothing comes up after a few minutes look at the task bar, at the bottom of the screen. There should be a orange flashing icon, click on it.
5. Once the remote program is opened you will see this screen, wait a few seconds and “Your ID” field in the blue box, will populate. Send this number to your technician so they can log in.
6. When your technician attempts to log on you will see this screen. Check the “Allow access to my computer” box and click “Accept” (Next to the green lines)